Our DIY Wedding

I had the most amazing, simple wedding in my brother’s backyard.  It was the perfect summer day, surrounded by a select group of my very favorite people.  It really was exactly the way I had it pictured in my head, and it was about as DIY as you can get.  We rented tables, linens, chairs and had the meat catered.  Those were our only short cuts.

I knew from the beginning that, for me, the magic would be in the details.  Maybe nobody else would notice them, but they were important to me.  And so began months of trial and error, blood and tears, long nights and lots of wine consumption.  In the end, it was worth every second.

Here are a few of the details.  We didn’t hire a photographer, and I do kind of regret that.  Only because some of the details were missed, NOT because I wanted pictures of me.  No no no.  No pictures of me.

signs E


My daughter made the welcome sign.  I painted all of the white signs and my amazing sister-in-law put them all together.  Spray paint was my best friend.


Guest Book E


Our guest book was so much fun, and something that we will treasure forever.  I already had the book of thumbprint ideas.  I got a small sketch book from the craft store, a nice set of fine point pens, and colored ink pads.  Our friends and family got very creative with their creations.


menu E


Our menu was written on an old window that had been lined with craft paper.  My amazing daughter helped with this, too.  We propped this next to the door of the summer kitchen where the buffet was served.  One of the benefits of your brother having an old farm house is the abundance of old crap left over from renovations.  We upcycled as much as we could.


drinks E


We kept non-alcoholic drinks simple.  Sweet tea and lemonade were the main attractions.  I played around with real strawberry lemonade, but in the end, simplicity won out.  The strawberries were used as a garnish only, and that was ok.

drinks2 E


Water bottles and juice for the kids were kept cold in tubs filled with ice.


plasticware E


One of my favorite details was the wrapped plasticware.  I wrapped each set in a paper napkin, tied with some tan yarn and added a flower detail.  Simple and so cute.  We stacked them in an old drawer left over from the kitchen renovation.  It really was adorable.


chip bag EI think we got the most comments on these funny paper chip bags.  I found a tutorial on YouTube for paper gift bags, and scaled them down to fit individual servings of chips.  They were a great addition to the buffet table.  I also made serving platters out of dollar store ceramic candle sticks and large serving dishes we found at an antique mall.


bar2 E

“Alcohol! Because no great story ever started with someone eating a salad.”  My brother built me a bar.  FOR REAL! We provided a little bit of a bunch of stuff.  There were a few mixed drink options, lots of shot options, and plenty of options for spiking the sweet tea and lemonade.


flowers Eflowers2 EGrocery store flowers.  Yep.  And they were perfect.  I fancied up some jelly jars, pizza sauce jars, mustard jars…..any jar we emptied, really.  They added a great splash of color to the white table linens.


dessert E


We didn’t do a cake cutting ceremony.  The five minute wedding ceremony was already more “center of attention” than I wanted, so we just served dessert.  Cupcakes, cookies and mini pies. There was even a gluten free option.


silly props Eprops Eprop frames E


I spent a good amount of time trying to come up with things that would keep my guests entertained since we weren’t doing the traditional wedding activities.  These props were fun.  My mom and I found old frames that I spray painted fun colors.  The large red frame was made by my dad.  We attached drawer handles to the back of it to make it easier for people to hold.

I found prop templates online, traced them onto foam sheets and attached them to skewers (sharp tip removed) after they were cut out.

yard games E twister E horseshoes E Hayden horseshoes E


Yard games were also a big hit.  Some we had, some we bought, some we made.


Badminton/ Volley ball


Lawn twister


Horseshoes

My dad also made us an awesome corn hole game and we rented a large bounce house for the kids.  Well, it was FOR the kids, but I kicked them out a few times so the adults could jump too.  It was only fair.

lights E


I loved these lights, and they were a pain in the butt for my brother to hang.  They deserved to be featured on the interwebs, too.

We also had a beautiful fire pit with hay bale seating that I don’t have a good picture of.  The kids enjoyed making s’mores around the fire and the teenagers used it as their hang out spot.  It was perfect, too.

It really was a simple, amazing day.  All of the stress leading up to the finished product was worth it.  I would do it again and again.

Posted in Uncategorized | Tagged , , , , , , , | 1 Comment

Candy Carrots

Here’s a quicky post I’ve been meaning to put up since Easter.  Can we say SLACKER!?!  Add to that the fact that I forgot to get a picture of the finished product on their intended cupcakes, I seriously suck at this blog thing.

There aren’t a whole lot of instructions to go along with these candy carrots.  I used green airheads and orange starburst.  Each carrot was one startburst.  I warmed them in the microwave until I could shape them in my hands.  They never got super soft because I didn’t want them to melt.  While they were still soft I used a toothpick to poke a hole in the top of each.

For the green carrot leaf I cut a very long V shape out of the thinner parts of the airhead candy.  With a sharp knife I cut slices out of the top of the V.  The pointy end got shoved into the toothpick hole end of the soft carrot.  You might want to have the green bits ready before the carrots, so the carrots can stiffen up with the leafy part attached.

These are very simple and I bet there are a ton of other things you can do with this general idea.

Here are the photos –

CandyCarrots.jpg


Posted in Baking, DIY, recipe | Tagged , , , , , , | 4 Comments

And the times, they are……

a chaaaaaaangin’.  So is this blog.

Thanks to some wrist pain, I’ve had to take an indefinite break from yarn.  My lovely wrist brace is helping quite a bit, but now I’m just plain scared.  Like…..monsters under the bed, things nightmares are made of, scared.  The yarny goodness To Do list is growing like crazy, and I can’t bring myself to dust off the needles and hooks.  I know I’ll get there, but in the meantime, I’ve had to come up with  other things to keep myself from having a productive, grown up life.

While I don’t think I will ever achieve “extreme” status, my couponing efforts are finally starting to pay off.  I have my first stockpiles and my children are officially too embarrassed to help with the shopping.  I must be doing something right.

I’m WAY more excited about baking though!  Yeast bread is my new obsession.  There is soooooooo much to learn, and so many handy gadgets to try.  So far I’ve learned cinnamon swirl bread, soft pretzels, hot dog rolls, croutons, beer bread, honey wheat oatmeal bread, yummy crusty dinner rolls, scones (not a yeast bread), pizza dough and quick blueberry biscuits.  FYI, beer bread is gross if you don’t like beer.  I don’t like beer.  My honey took it to work though, and it was gone by 9 am.  I wanted to rip my tongue out.

This blog has never solely been about yarn happiness, but that was the original intent.  So much for that.  I really hope to get back there soon.  For now, expect to see a menagerie of things.  A plethora of stuff.  An eclectic mix of bits and baubles.  Or maybe I’ll just work my favorite words into random sentences.  MERGE! (or just shout them out)  At any rate, changes.

Posted in Uncategorized | 1 Comment

Pretty Flower Coaster…..or whatever

20140130-071048.jpg


I’m coaster crazy right now.  There are many big projects coming up and mass amounts of coasters is the easiest one to tackle when it’s too cold out to do much else.  I’ve found some great patterns, and this is the Frankenflower that came from those.  I love the way this one turned out, and the possibilities are endless!  I’m thinking about putting a bunch of these together to make a table runner.  Wouldn’t that be cute!?!

As always, do your own thing.  This is what I did.  Keep in mind that your yarn and hook size will determine the size of your flower.  Also, changing the stitches up will help you get the size you need.  Using HDC until round 4 (use DC in round 4) will make a flower that’s about 4.5 inches.  Using DC for the whole flower will make a flower that’s about 5 inches.  I haven’t gone bigger or smaller, but feel free to do so.

What you need –  5 mm crochet hook, Sugar n’ Cream cotton

Round One

Using a magic circle, chain 2 (counts as first HDC), make 15 HDC in circle.  16 HDC total.  Slip Stitch in beginning chain 2 to join

Round Two

Chain 4, HDC in same stitch.  *Skip next stitch. HDC in next stitch, chain 2, HDC in same stitch*  Repeat from * to * around.  Slip Stitch in 2nd chain in beginning chain 4 to join.

Round Three

Slip Stitch into chain 2 space, chain 2 (counts as first HDC).  Make 4 more HDC in chain 2 space.  Chain 1.  *Make 5 HDC in next chain 2 space.  Chain one*  Repeat from * to * around.  Slip Stitch into beginning chain 2 to join.

Round Four

*Skip 2 stitches.  In the 3rd stitches make 6 DC.  Skip 2 stitches.  Slip Stitch into chain 1 space*  Repeat from * to * around.

Cut yarn, fasten off, sew in ends.  Flower!


Posted in Crochet, DIY, Pattern | Tagged , , , , , , , , | 1 Comment

Dude, let me help you get lucky

1000740_10202364189486503_983456488_n

Dear Men,
Have you ever wondered what your woman really wants? Have you ever taken the time to think of a way to show her your appreciation for all that she does to make your life easier? Screw that. Have you ever wondered how to turn her from a homicidal Martha Stewart into a playful Jenna Jameson? Here’s the secret to making a woman feel loved, appreciated, and open to a little (or a lot of) hanky panky.

CLEAN UP AFTER YOURSELF! Get your filthy underwear off the floor. Don’t just put your dishes in the sink if the dishwasher is empty. Put dinner away. Hell, cook dinner.

It’s really not that hard guys. Women aren’t the complex creatures we’ve been made out to be. Yes, our definitions are different than yours. Our expectations are different than yours. (Ok, so we’re a little complex). WE ARE DIFFERENT THAN YOU! Dude, that’s part of the reason you like us. If you want our girl parts to do stuff with your boy parts, please take this letter to heart.

We appreciate everything you do for us, and we do our best to show you that appreciation. We remember when you mentioned, 2 years ago, that you’d like to see Nine Inch Nails live again. That’s why we surprised you with those tickets. We didn’t forget when your mom told us your favorite childhood sweet was Aunt Peg’s chocolate cream pie. That’s why we spent 6 hours on a Saturday, sweating our ass of in your mom’s attic (wondering how hard it would be to get her on Hoarders) looking through 40 years of accumulated crap to find dearly departed Aunt Peg’s recipe. We are thoughtful, considerate creatures, and we love you.

We also understand that you aren’t (through no fault of your own) thoughtful or considerate. We overlook it on a daily basis. We let it slide when you blow off eating dinner with us to watch the game in the other room. We don’t let it bother us when you don’t remember (even though we’ve been talking about it a lot) that the super important thing that has given us anxiety for weeks, was today. We get that these things don’t mean that you don’t love us, even when we hide in the bathroom to cry, or tackle that pan from dinner with inhuman strength so we don’t punch you in your stupid, thoughtless head.

We get you. Now it’s your turn.

I’m not promising that these tips will have you bumpin’ uglies tonight. I don’t know how big the sexless hole is that you’ve dug for yourself. These things will help though. Please believe that we think about gettin a little sumthin sumthin way more than we’re given credit for. We want a little slap and tickle, we’re just too tired to show it.

Tip One
Don’t wait until we’re half way through a household tast to ask if we need help. Trust and believe, we’ve already creatively cursed you out. It really is a good thing you can’t read our minds. By this point, your beheading would be more welcome than your help. However…..

Tip Two
…this does not mean you can’t find something else that would be helpful. On your own. Without asking what else needs to be done. For real. You live in this filth. You created this filth. How is it that you can’t see what needs to be done without being told? There is always something that needs to be done. If you’re really not able to think of anything, sweep the kitchen floor. Yep. It’s simple. It’s fast. It’s one less thing we have to do. (It’s a little more energy we’ll have between the sheets)

Tip Three
Don’t ever, under ANY circumstances, make any kind of comment about a mess we’ve made. Don’t draw attention to it. Don’t look at it. Ignore the mess. We are allowed to make messes. YOU are not. Let me explain that. Historically speaking, who cleans up after the kids? We do. Who cleans up after you? We do. Who does the majority of the cleaning? We do. So, it’s safe to say we’ll clean up our mess, right? Right. So just shut up.

Tip Four
We love positive attention, but you knew that already. This is the simplest tip to follow. It should go without saying. Maybe you already do this, and kudos to you if you’re that guy. Tell us something nice about us. Not the house or dinner. Us. “Boy honey, that kitchen counter sure is clean” is not going to help get us in the mood as much as giving us a hug and telling us our hair smells nice. Squeeze our hand and tell us how soft our skin is. And a never fail compliment – we look nice in that color. Delivery of the compliment isn’t all that important. We don’t need you to longingly look into our eyes. In fact, that creeps some of us out (me!). It really is the thought that counts. Just hearing the words, and knowing that you noticed something nice about us can go a long way in improving our day and your sex life.

Tip Five
If there are kids involved in your relationship (it doesn’t matter if they’re hers, his or ours) have your woman’s back. I’m not saying you should jump in and involve yourself unless you know for sure that’s what she wants. What I’m saying is simpler than that. Support her. After a screaming match with a difficult 3 year old, tell her she did a good job not giving in. Hell, a smile and a nod during the battle is enough to boost our bruised and battered mommy heart sometimes. When our teenagers, in their struggle to define themselves, have torn us apart to the point that we want to run and never stop, help us remember the good we’ve given them. Remind us that our babies eventually come back to us, and all of the struggles, sleepless nights and gray hairs are worth the definition they will find when they’re ready. When our children become kind, compassionate and thoughtful adults, remind us that we did that.

Now, how do these tips help Mr. Happy get some much needed and (I’m sure) much deserved attention? It’s really simple. We carry the weight of the world on our shoulders. Not just our world. We carry your world, the kid’s world, our boss’s world, our best friends world on our shoulders. Picture that weight as a chastity belt made out of unbreakable puzzle pieces. Each worry, stressor, obligation, chore, duty, unmatched sock is a piece of the belt that’s preventing you from getting a piece of ass. If you can help rid us of these heavy puzzle pieces, the belt will fall off much faster.

Science, or something, has proven that we are emotional beings. By following these tips, you’re helping our emotions guide us in a happier direction. You’re acknowledging our struggles. You’re showing us that you care by taking some of this weight away. It’s a lot easier to get our pants off when the weight is lessened.

One last tip –
Please don’t let her know that sex is your only motivation for doing something nice for her. If it really is your only motivation, maybe you should reevaluate your relationship. If you can see the trip to funky town as an added bonus to making your lover happy, that’s probably the better way to go. However, if sex is the bigger motivator, hide it. Lie. Whatever you do, don’t show your frustration if the tips take a while to work. You never really know how many pieces make up her belt.

I wish you all the best. You have it in you to conquer these tips and discover a few more on your own.

Sincerely,
Women

Posted in Uncategorized | 1 Comment

Halloween Pin-spiration

I have a Pinterest addiction.  I have ELEVEN crochet/knitting boards.  If you’re interested, you can find me by searching Kristin41478.  I wanted to share with you a few things that I’ve enjoyed making the most this Halloween, thanks to the awesome that can be found on Pinterest.  You still have time to whip up a few of these goodies too.  I didn’t use a pattern or even follow the links that accompanied the pictures I found, I just made them up as I went.

Halloween Hand Sanitizer

Image

This is a super fantastic project for scrap yarn.   I found the felt Halloween stickers in the $1 section at Target.

Tips-

Make as many chains as you need to go around the base of the bottle.  Half double crochet in the round until the bottle starts to get smaller.   Decrease by 4 (or as many decreases as you need for the shape of your bottle) for 1 or 2 rows (again, depending on the shape of the bottle).  End with a row of single crochet right before the cap of the bottle.

You can make the handle separately and attach it when you’re done, or you can reattach your yarn to the other end of the sanitizer holder and go from there.  I went down at least one hook size, and as you can see, none of my handles were the same size.  With the smaller hook, chain as many as you need to make the handle the length that you want it.  Go down to an even smaller hook size to make the button hole.  I think I went down to a 3.25 mm hook.  With the smaller hook, chain as many as you need to go around the button you’re using, slip stitch into the first chain you made with the smallest hook (this forms your button hole), switch back to the hook that you used to start your handle and slip stitch back to the beginning.  Attach your handle if you haven’t already.  Sew the button into place directly across from the base of your handle.

Odds and Ends tips –

For the fun hand sanitizers with the stickers, I used worsted weight acrylic yarn.  Even though the stickers were sticky, I still used a hot glue gun to attach them.  I know a few little monsters that will pull apart anything they can.  For the everyday hand sanitizers, I used cotton yarn.  I really like the way this looks.

Candy Corn Treat Bags

Image

This is the horrible-est picture ever.  Sorry.  I made these for a friend, and I forgot to get a real picture before she picked them up.  They turned out to be super cute, and I didn’t want a craptastic picture to stop me from telling you about them.

Tips –

These are pretty self explanatory.   I think I started with 5 half double crochets in a magic circle and increased by 3 in every other row.  I also made a larger one as a trick or treat bag.  You might want to double the yarn (hold 2 strands together) if you make a trick or treat bag.  I ended up with a pretty floppy bag.  That’s fine for older kids, but toddlers need something that holds its shape a bit better.  Please don’t let this picture keep you from making these.  I really hate the camera on my ipad.

Felt Skull Beanies

Image

I love these.  I did two for my nieces with the heart eyes and the others I wanted more unisex, so I stuck with circular eyes and used black thread for the nostrils.  I think I like them better with the circular eyes.  If you need help with a basic beanie, check out bobwilson123 on YouTube.

Tips –

Get creative!!!  Don’t let the lack of a printer stop you from making something out of felt.  I had to get very creative for these hats.  My printer is, sadly, no longer with us.  He had a long and productive life and all good things must come to an end.  I found a skull that I thought I could make work here.  It wasn’t quite right for what I was doing.  Little nieces have little heads, therefore they need little skulls.

Because my printer took a crap is deceased, I used my ipad.  I took a screen shot of the iron on decal and then traced it onto a piece of paper.  These are the screen shots I used.  (I even had to make it my lock screen so it would stop moving while I traced!  That’s desperation right there folks.)

skullsOnce I had the pieces the size I wanted them, I cut them out, combined them and traced them again.  Once I had the second tracing the way I wanted it, I cut it out and traced it once more onto cardboard.  (you can skip the cardboard if you’re only making one hat.  I was making a few and wanted something more sturdy to trace onto the felt).  Finally, I traced the skull onto white felt, cut it out, and attached it with black thread and a whip stitch.  Was there an easier way to get the results I wanted?  Probably.  Sometimes you have to make do with what you have.

skull hats                                      (another craptastic picture.  i’m working on that)

Happy Halloween everyone!

Posted in Crochet, Pattern | Tagged , , , , , , , , , , , | 1 Comment

Sugar Free Blueberry Syrup

image

I’m going to let you in on a little secret. I hate artificial sweetener. There are just some things that need to be real, and in my book, sugar is one of them. However, living with a diabetic has seriously cut down on my sugar intake. I try to be supportive. I really do. That’s where this surprising bit of yummy came from.

I think this recipe will work with most fruit. I’ve only tried strawberries and blueberries, and both turned out fabulously. It’s amazing on ice cream, as a glaze for a fruit tart, or on French toast. Or, ya know, by the spoonful is good too.
Ingredients –

1 cup fresh or frozen blueberries

1 cup water

1-4 packets Splenda

1 tsp corn starch

1/2 tsp vanilla

small amount of white sugar (optional)

Direction –

Bring the berries and water to a simmer. Add the corn starch, vanilla and as many Splenda packets as you like. Continue to simmer until the berries are soft. I just let it go on a low simmer while I prepped and started the French toast. I did add less than a teaspoon of granulated sugar to mask the artificial sweetener taste just a tad. Remove from heat and let the sauce thicken.

And that’s it. Pretty simple and very tasty. I like a little extra texture in my syrup, so when I removed it from the heat I threw in a few more fresh berries to soften up in the cooling goodness. If you don’t like texture in your syrup you can always strain the fruit out.

image

Posted in recipe | Tagged , , , , , , | Leave a comment

This hooker is also a tart…..maker

20130827-140552.jpg

I thought being a hooker was cool.  Boy, I had no idea how much cooler it would be to become a tarty hooker.  (The jokes!  Oh the jokes!)  I’m poor cheap.  Frugal even.  So, the other day when I cleaned out my candle cubby, I decided that I would find a useful way to use the old candles I’d been hoarding saving and……a TART was born!

If I had known making these would be so easy, I would have started making them a long time ago.  As usual, I will give you the basics to get you started.  Feel free to get creative.  If I can figure this out successfully on the first try, YOU will be able to do amazing things with this tarty goodness.

You need –

(the necessities)

sauce pan with boiling water, old candles, silicone ice cube trays or old glass candle jars, plastic spoon

(optional)

cookie sheet, foil, electric candle warmer, damp paper towel

Let’s get started –

Place your candle in the sauce pan.  Put enough water in your sauce pan to cover all or most of the wax in your candle.  (the water does NOT go in the candle, it just goes in the pan)  If you’re not using a candle that is already in a glass jar, you’ll need to find something  to put in the pot that can hold the candle and not be ruined.

Bring the water to a boil.  Continue to boil until all the wax is melted.  I use the plastic spoon to pull the wick out as soon as the wax is soft enough.  That helps to cut down on the little black floaters (or sinkers) that will be left when everything is melted.

20130827-132242.jpg

Remove the melted wax from the pot and let it cool on a trivet (or whatever) until you can handle it without hurting yourself.  When you’re able to handle the hot wax, pour it into the ice cube trays.  Let the wax cool in the tray until it no longer spills when you move it, then place it in the freezer.  It doesn’t take very long to cool the whole way in the freezer.  Less than half an hour.

20130827-134001.jpg

Before going in the freezer…..

20130827-134011.jpgOut of the freezer…..

Loosen the tarts from the ice cube tray and turn it upside down.  They should fall right out.  There ya have it.  Adorable tarts that don’t take long to make and help you save money.  Every penny counts, right?

Oh right!  The optional stuff.  The cookie sheet and the foil were to give you a more stable, flat place to fill your ice cube trays.  Well, the cookie sheet was, the foil was for easy clean up.

The electric candle warmer….I found a little trick for making the tarts look a bit more professional.  If you want to give them as a gift, you might want to try this.  The bottom of the tarts can come out a little rough, depending on how much you overfill or spill on the ice cube tray.  To fix this after they come out of the freezer, turn on your electric candle warmer and place a damp paper towel over the warming plate (ok, so this isn’t the safest, most responsible thing to do, but I’m assuming you’ll all be careful).  After you’re all warmed up, rub the bottom of the tart on the hot paper towel and smooth out any rough spots.

These would be super cute packaged up.  It’s not really re-gifting if you’ve upcycled it, right?

Posted in DIY | Tagged , , , , , , , , | 3 Comments

Diabetic Friendly Jello Pie

20130628-105937.jpg

This is simple, refreshing, and not bad for you. As sweet summertime desserts go, what more could you ask for? This will just be a quick post to get the nutrition facts down before I loose them.

The basic pie –

Any flavor sugar free Jello (0.03 oz box)

A whole tub of frozen light whipped topping – thawed

3/4 c boiling water

1 c cold water

Ready to serve Graham Cracker pie crust

Directions –

boil 3/4 cup water and stir into or pour on top of the powdered jello. stir until dissolved, about 2 mins.

put 3 or 4 ice cubes in a measuring cup and then fill to the one cup mark. this will help the jello cool off faster and speed up the pie process a bit. add the cold water to the hot jello mixture. stir until ice cubes are dissolved or until the liquid is cool and remove extra ice cubes.

with a wire whisk (or whatever you like. i like the whisk), mix in the light whipped topping. stir until well combined. it will feel wrong to stir the air out of the whipped topping, but don’t worry. it will be fine.

stick the jello/whipped topping mixture in the fridge for no longer than an hour. you want this to soft set before you put it in the pie shell. it will make a prettier pie if you don’t have to spoon lumps of oooey goodness into the pie shell. I always have extra filling, so I put that in a small bowl for the kids to share later.

chill your pie for about 4 hours. it will cut perfectly! wait until you see just how perfectly this pie cuts. seriously, it’s perfect.

that’s the basic pie. there are so many variations you could try. imagine the possibilities! the following nutrition facts are for the pie above, only with the Keebler Chocolate Crust. There will be very little difference if you use another crust.

Calories 111.7, Total fat 5.1 g, Saturated fat 4.3 g, Sodium 60 mg, Total carbs 15.3 g, Dietary fiber .02 g, Sugars 5.3 g, Protein 1 g

Posted in Uncategorized | Leave a comment

Baby Shower Fun

Last summer, as some of you may know, we had some amazing additions to our family.  I had the stress pleasure of throwing a baby shower for my sister.  If you’ve thrown a shower or similarly stressful exciting party, you’ll understand and forgive me for not having more pictures.  I was trying not to pull my hair out to keep things going smoothly and didn’t have time to get any of the party itself.  These are the few I took during the weeks of party prep.

IMG_4733
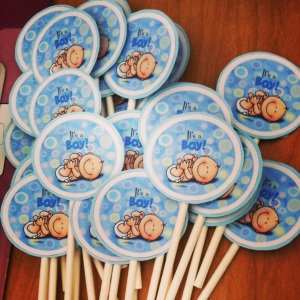
These started out as cupcake toppers, but we decided to go with mini cupcakes and they became everything toppers.  They were adorable peeking out of centerpieces and food displays. (lollipop sticks, card stock and printer paper)

IMG_4732
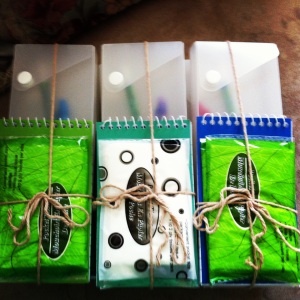
If I had my way, no child would ever be invited to a grown up party EVER.  Ok, that’s a little harsh, so we allowed double digits.  Since it was late summer and we were all gearing up for the new school year, I made up some adorable pencil cases full of fun school supplies.

IMG_4734Of course, I had to add some crochet to the adult party favors.  These spa cloths are fabulous.  I use them all the time.  Sugar and cream cotton in a 10×10 (or 9×9, I can’t remember) square.  I LOVE THEM!

IMG_4740

My sister-in-law made these sugar scrubs.  I don’t have a link for this specific one, but there are tons of directions out there if you consult google.  She did some with lemon and some with tea tree oil.  Holy moly, this stuff is amazing.

IMG_4735

Simple packaging for the favors.  Brown paper bags, a hole punch and some yarn.  I used printed labels for SOOOOO MUCH during this party.  You can see them here.  I also printed out the name of each dish on the gigantic food table and attached them to a folded index card.  They made the gigantic food table look so cute and answered the “what’s this?” question for the guests before they could even ask. Did I mention the food table was gigantic?

IMG_4741

We played a typical baby shower game or two, but after planning the games for a few showers in the last few years, I was bored with the different variations of the same sad baby shower games.  Instead, I had the guests decorate onesies.  This had the potential to go horribly if the guests weren’t interested, or run the party super duper late if they really got into it.  I was trilled when it headed toward the running late side of things.  We gave the guests the option of using some pre-printed graphics on transfer paper (not everyone is creative) or cutting their own design from fabric pieces that had iron on adhesive ready to go.  We provided some stencils and samples (the photo above), and the guests went crazy!

IMG_4736

These amazing cupcakes were a HUGE hit!  Seriously, make these.  Make a lot of these.  I made them mini because that was kind of the food theme for the party.  My sister had gestational diabetes (lucky her!), so making things in bite size portions allowed her to get a taste of  everything without messing with her sugars too much.  But enough about her…..these cupcakes are DA BOMB!

IMG_2251IMG_4645

The point of a shower is to show the mama some love and support through expensive, unnecessary, and sometimes pretentious gifts.  Ok, most of the time the gifts are pretentious.  But really, it all comes down to the crazy amount of love you have for someone that you haven’t even met yet.  That itty bitty bundle of everything good and kind and fantastic in the world.  This amazing little guy might hate me (I’m secretly really proud of the magical ability I have to make him scream just by walking into the room), but I’ve loved him since he was just an idea in my sister’s head.

Party food ideas that we tested and approved for you!

Dill Dip In A Bread Bowl

Hibiscus-Honey Tea

Guacamole Bruschetta

Mini Caprese Bites

Raspberries With Chocolate Centers

Baked Spinach Dip Mini Bread Bowls

And lots of other things.  If it could be put on a stick, we served it that way.  FUN STUFF!

Posted in Uncategorized | 1 Comment